T6.1-tropical-glaciers – Environmental suitability model
Tropical Glacier Ecosystems are facing extreme pressure due to climate change and face imminent collapse in this century.
We explore here future projections of one direct and one indirect indicator of key ecosystem properties and use these to explore the probable trajectories toward collapse of the ecosystem. We evaluate the usefulness of relative severity and extent of degradation to anticipate collapse.
We discuss here details of the suggested formula for calculation of relative severity $RS$ and different approaches to summarise and visualise data across the extent of the ecosystem assessment unit.
We use the tropical glacier ecosystems as a model because:
risk of ecosystem collapse is very high and well documented
future probabilities of collapse can be projected from mechanistic models,
the different assessment units differ in extent: from the isolated glaciers in Indonesia and Venezuela to the highly connected of the Sierra Blanca in Peru.
We use projected degradation of climatic suitability because:
it is conceptually linked to models used to calculate probability of collapse
it uses the same underlying variables models and scenarios
we can explore different time frames (temporal scale of degradation)
we can explore uncertainty due to different models, scenarios and collapse thresholds
This repository includes all steps for fitting a environmental suitability model for tropical glacier ecosystems and compare the results with simulation results from a hybrid model of glacier ice mass balance and dynamics.
The repository has the following structure:
env folder
The workflow was developed using different computers (named terra, humboldt, roraima), but most of the spatial analysis has been done in Katana @ UNSW ResTech:
Katana. Published online 2010. doi:10.26190/669X-A286
This folder contains scripts for defining the programming environment variables for working in Linux/MacOS.
notes folder
Notes about the configuration and use of some features and repositories: OSF project management with R, using the quarto book project, running pbs jobs in katana, fitting GLMM with the glmmTMB package.
inc folder
Scripts used for specific tasks: R scripts for functions, tables and figures, quarto documents for publication appendices and PBS scripts for scheduling jobs in the HPC nodes in Katana.
docs-src folder
This contains the (quarto-) markdown documents explaining the steps of the workflow from the raw data to the end products.
SpacyDotNet is a .NET wrapper for the natural language library spaCy
Project scope and limitations
This project is not meant to be a complete and exhaustive implementation of all spaCy features and APIs. Altough it should be enough for basic tasks, think of it as a starting point, if you need to build a complex project using spaCy in .NET
Most of the basic features in Spacy101 section of the docs are available. All Containers classes are present (Doc, DocBin, Token, Span and Lexeme) with their basic properties/methods running. Also Vocab and StringStore in a limited form.
Nevertheless any developer should be ready to add the missing properties or classes in a straightforward manner.
Requirements
This project relies on Python.NET to interop with spaCy, which is written in Python/Cython.
It’s been tested under Windows 11 and Ubuntu Linux 20.04, using the following environment
It should work with spaCy 2.3.5 and any other spaCy version that changes only its minor/patch version number
Python.NET has been tested with Python releases 3.7 to 3.13
Setup
1) Create a Python virtual environment and install spaCy
It’s advised to create a virtual environment to install spaCy. Depending on the host system this is done in different ways. The spaCy official installation guide is fine
To run the examples, we’ll also need to install the correspoding language package (es_core_news_sm) as shown in the guide.
2) Check for Python shared library
Python.NET makes use of Python as a shared library. Sadly, seems like the shared library is not copied with recent versions of virtualenv and it’s not even distributed in some flavours of Linux/Python >= 3.8
While I don’t understand the rationale behind those changes, we should check the following:
Windows
Check whether python312.dll in located under <venv_root>\Scripts folder. Otherwise, go to your main Python folder and copy all dlls. In my case: python3.dll, python312.dll and the vcruntime140.dll
Linux
Check whether a libpython shared object is located under <venv_root>/bin folder.
If not, we first need to check if the shared object is present on our system. find_libpython can help with this task.
If library is nowhere to be found, it’s likely that installing python-dev package with the package manager of your favorite distribution will place the file in your system.
Once we locate the library, drop it to the bin folder. In my case, the file is named libpython3.12.so.1.0
Usage
SpaCyDotNet is built to be used as a library. However I provide an example project as a CLI program.
1) Compile and Build
If using the CLI to run .NET, (Linux), we should simply browse to Test/cs folder and compile the project with dotnet build. Under Visual Studio, just load Test.sln solution
2) Run the project
The program expects two parameters
interpreter: Name of Python shared library file. Usually python312.dll on Windows, libpython3.12.so on Linux and libpython3.12.dylib on Mac
venv: Location of the virtual environment created with a compatible python and spaCy versions
Run the example with dotnet run --interpreter <name_of_intepreter> --venv <path_to_virtualenv> or if using Visual Studio, set the command line in Project => Properties => Debug => Application arguments
In my case:
Linux
dotnet run --interpreter libpython3.12.so.1.0 --venv /home/user/Dev/venvSpaCyPy312
Windows
dotnet run --interpreter python312.dll --venv C:\Users\user\Dev\venvSpaCyPy312
Code comparison
I’ve tried to mimic spaCy API as much as possible, considering the different nature of both C# and Python languages
C# SpacyDotNet code
varnlp=spacy.Load("en_core_web_sm");vardoc=nlp.GetDocument("Apple is looking at buying U.K. startup for $1 billion");foreach(Tokentokenindoc.Tokens)Console.WriteLine($"{token.Text}{token.Lemma}{token.PoS}{token.Tag}{token.Dep}{token.Shape}{token.IsAlpha}{token.IsStop}");Console.WriteLine("");foreach(Spanentindoc.Ents)Console.WriteLine($"{ent.Text}{ent.StartChar}{ent.EndChar}{ent.Label}");nlp=spacy.Load("en_core_web_md");vartokens=nlp.GetDocument("dog cat banana afskfsd");Console.WriteLine("");foreach(Tokentokenintokens.Tokens)Console.WriteLine($"{token.Text}{token.HasVector}{token.VectorNorm}, {token.IsOov}");tokens=nlp.GetDocument("dog cat banana");Console.WriteLine("");foreach(Tokentoken1intokens.Tokens){foreach(Tokentoken2intokens.Tokens)Console.WriteLine($"{token1.Text}{token2.Text}{token1.Similarity(token2) }");}doc=nlp.GetDocument("I love coffee");Console.WriteLine("");Console.WriteLine(doc.Vocab.Strings["coffee"]);Console.WriteLine(doc.Vocab.Strings[3197928453018144401]);Console.WriteLine("");foreach(Tokenwordindoc.Tokens){varlexeme=doc.Vocab[word.Text];Console.WriteLine($@"{lexeme.Text}{lexeme.Orth}{lexeme.Shape}{lexeme.Prefix}{lexeme.Suffix}{lexeme.IsAlpha}{lexeme.IsDigit}{lexeme.IsTitle}{lexeme.Lang}");}
Install via HACS. Alternatively, place the apps folder and its contents in your appdaemon folder.
Configuration
Main Config options
Variable
Type
Required
Default
Description
module
string
True
Set to xiaomi_button
class
string
True
Set to Button
buttons
string or list
True
entity_id of the xiaomi button. Can include multiple entities in a list or just one as a string
actions
list
True
List of actions. See Below
Actions Config Options
Variable
Type
Required
Default
Description
click_type
string
False
single
For buttons that support multiple click types (eg. single click, double click and long press) specify which one to trigger this action. Valid options are single, double and long_click_press
target_device
string
True
entity_id of the device that responds to button press. Alternatively can use the keywords lights, all_lights or group.all_lights to specify all light devices. Multiple entities can be provide in a list.
action_type
string
False
toggle
Valid options are turn_on, turn_off, toggle and dim_step
dim_step_value
integer
False
3
For dim_stepaction_type, the number of steps to cycle through brightness increments. (eg. value of 3 will cycle through 33%, 66% and 100% brightness)
Example usage 1
Bedside buttons that perform the following actions:
on single press: toggle bedroom light
on double click: toggle bedroom TV
on long press: turn off all lights and other devices in the house that might be on
Tarkin is a project aimed to perform anomaly detection over security logs data.
Approach
Have you ever felt a shiver down your spine at the sight of a log line, even before reading it completely? That’s because
you spotted something unusual and probably one or two old keywords that, in your experience, are usually associated with issues.
Detecting anomalies, and especially security-related ones, is a hard job that too often requires going through zillions
of log lines, queue messages, database registers, etc. To make things even more difficult this usually happens under tight
time pressure to identify the origin and reasons of an incident.
There are tools out there that promise to reduce this load by classifying them automatically but they are barely
more than specialized spam filters that pay little to none attention to the meaning of the message, and still require
to check on each tagged result to help improving the accuracy, making us work for the system but offering no flexibility.
We believe it takes more than statistics to spot particular types of anomalies. Also, we believe simplicity is the key
for powerful systems. This is why we decided to emulate the intuition of human analysts faced to this problem, modelling
the “fear” the feel by reading the logs through the filters of their instinct and domain experience.
The project is named after the Grand Moff Tarkin, a Star Wars character who lends his name to the Tarkin Doctrine, a
policy based he proposed to allow the Empire rule the galaxy without the burden of bureaucracy.
How it works (in a nutshell)
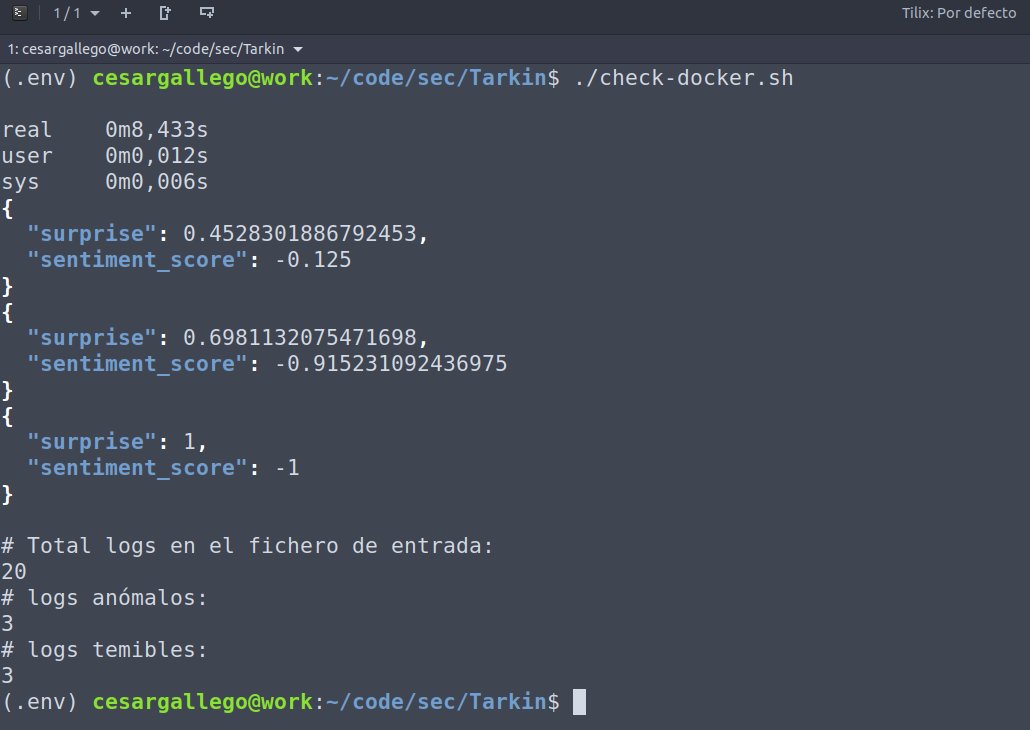
Tarkin implements a pipelined models strategy. The first step is training a character frequency model with a messages sample, then apply it to the content of testing/fresh incoming messages:
Then, adds sentiment analysis on top of that to show only messages with an overall negative meaning:
The resulting output is an indicator of the “fear” perceived in each message by the system, which is used to filter out the ones
below a threshold set by the model:
Requirements
You need Python 3.6.x or later to run Tarkin. You can have multiple Python versions (2.x and 3.x) installed on the same system without problems.
In Ubuntu, Mint and Debian you can install Python 3 like this:
$ sudo apt-get install python3 python3-pip
In OS X you can install Python using Brew like this:
$ brew install python3
For other Linux flavors and Windows, packages are available at
To run the project in your python3 environment, you will need to install the dependencies in the requirements.txt file, and
it’s highly recommended to create a separate virtual env, see below. Execute the following n a terminal window:
$ cd security-anomales-logs-data
$ pip install -r requirements.txt
Then, you will need to run the following command:
$ python -m spacy download en
Working with virtualenv
If you are using virtualenv, make sure you are running a python3 environment. Installing via pip3 in a v2 environment
will not configure the environment to run installed modules from the command line.
$ python3 -m pip install -U virtualenv
$ python3 -m virtualenv env
$ source ./env/bin/activate  # Enter into VirtualEnv
Quick start
There are several shell scripts available from the top level directory of the project:
build.sh: Initializes the environment creating the necessary folders and building the docker images.
The project can be run in your own machine and python installation. You will first need to run the training script, then
you can execute check.sh or check-demo.sh to analyze files configured in the same script or quoted sentences
passed as command line parameters, respectively.
train.sh: Starts the training of the letter frequency model, producing a letterspace.pkl binary file.
check.sh: Evaluates the infrequency and applies sentiment analysis to the logs of the file configured in the script.
check-demo.sh: Useful for demo purposes; evaluates the infrequency and applies sentiment analysis to a quoted sentence
received as a script parameter. NOTICE: unlike check.sh, this script returns an evaluation result even if the sentiment
score value is above 0.
You can also run the dockerized version of the project, which is launched using the following equivalent shell scripts:
train-docker.sh
check-docker.sh
check-demo-docker.sh
Notebooks
The project includes a notebook to illustrate how the fear indicator is calculated. Before being able to run it,
you’ll need to execute the following commands from your virtual env:
Then navigate on your browser to Tarkin/notebooks from the Jupyter Home tree
and open the file Log Mining.ipynb.
In case you experience an error running the notebook cells, make sure you executed the ./build.sh script
that sets up the project by building the docker images and downloading the default lexicon dictionary, which is used
by the notebook, or do it again if unsure.
Contributing
Feedback, ideas and contributions are welcome. For more details, please see the CONTRIBUTING.md file.
Last summer I was fortunate enough to take the trip of a lifetime with one of my work partners. Normally I’m a “hop-on, hop-off” trolley kind of tourist. For this trip, my friend and I wanted to find a healthier option that would allow us more freedome for sightseeing. We decided to use CitiBike, and we loved it so much we want to bring it back to Des Moines. We believe that CitiBike can lead to a heathier Des Monies overall by reducing emissions, increasing opportunities to breathe fresh air, and helping everyone close their Activity ring. We used data from New York City in August to create some visualizations that will help us communicate with our investors.
Results
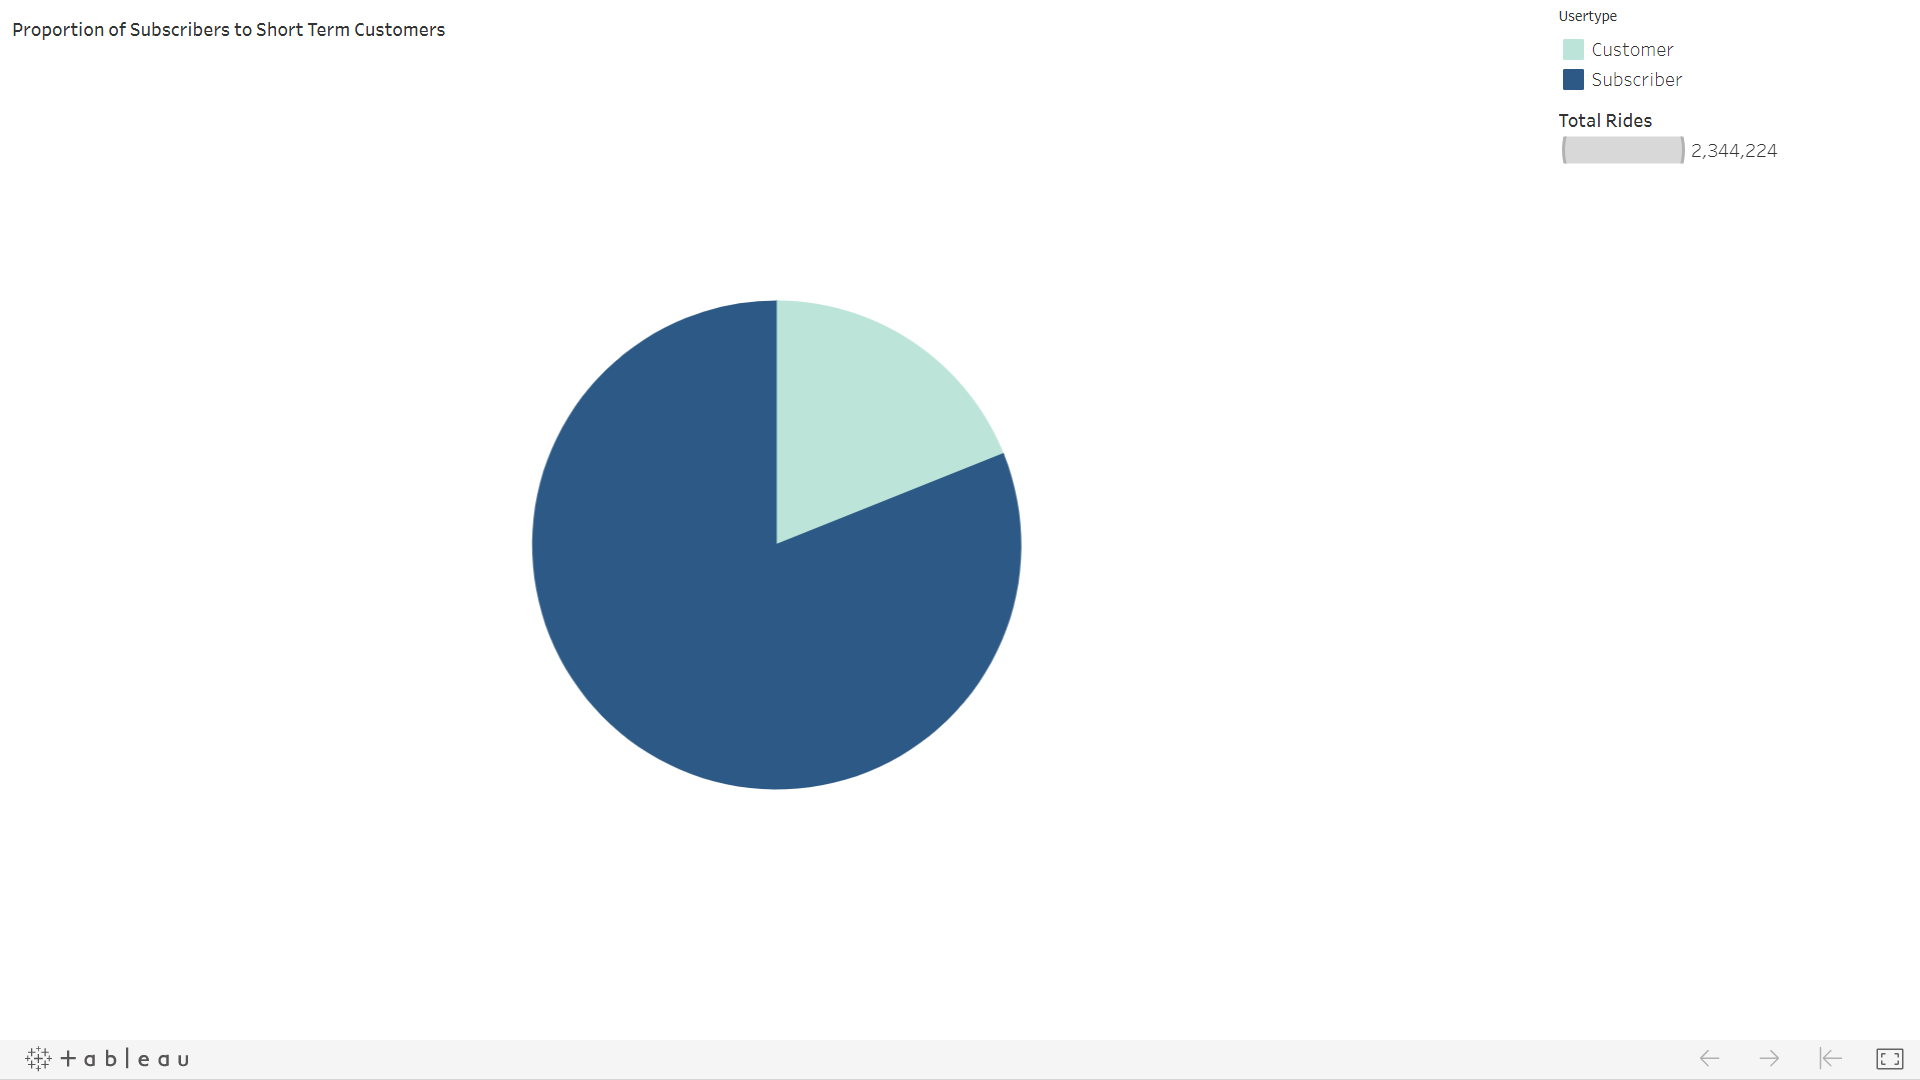
CitiBike customers took a total of 2,344,224 trips in the month of August. Let’s see what the data can tell us about what kind of customer uses CitiBike, and if it would be a good fit for Des Moines.
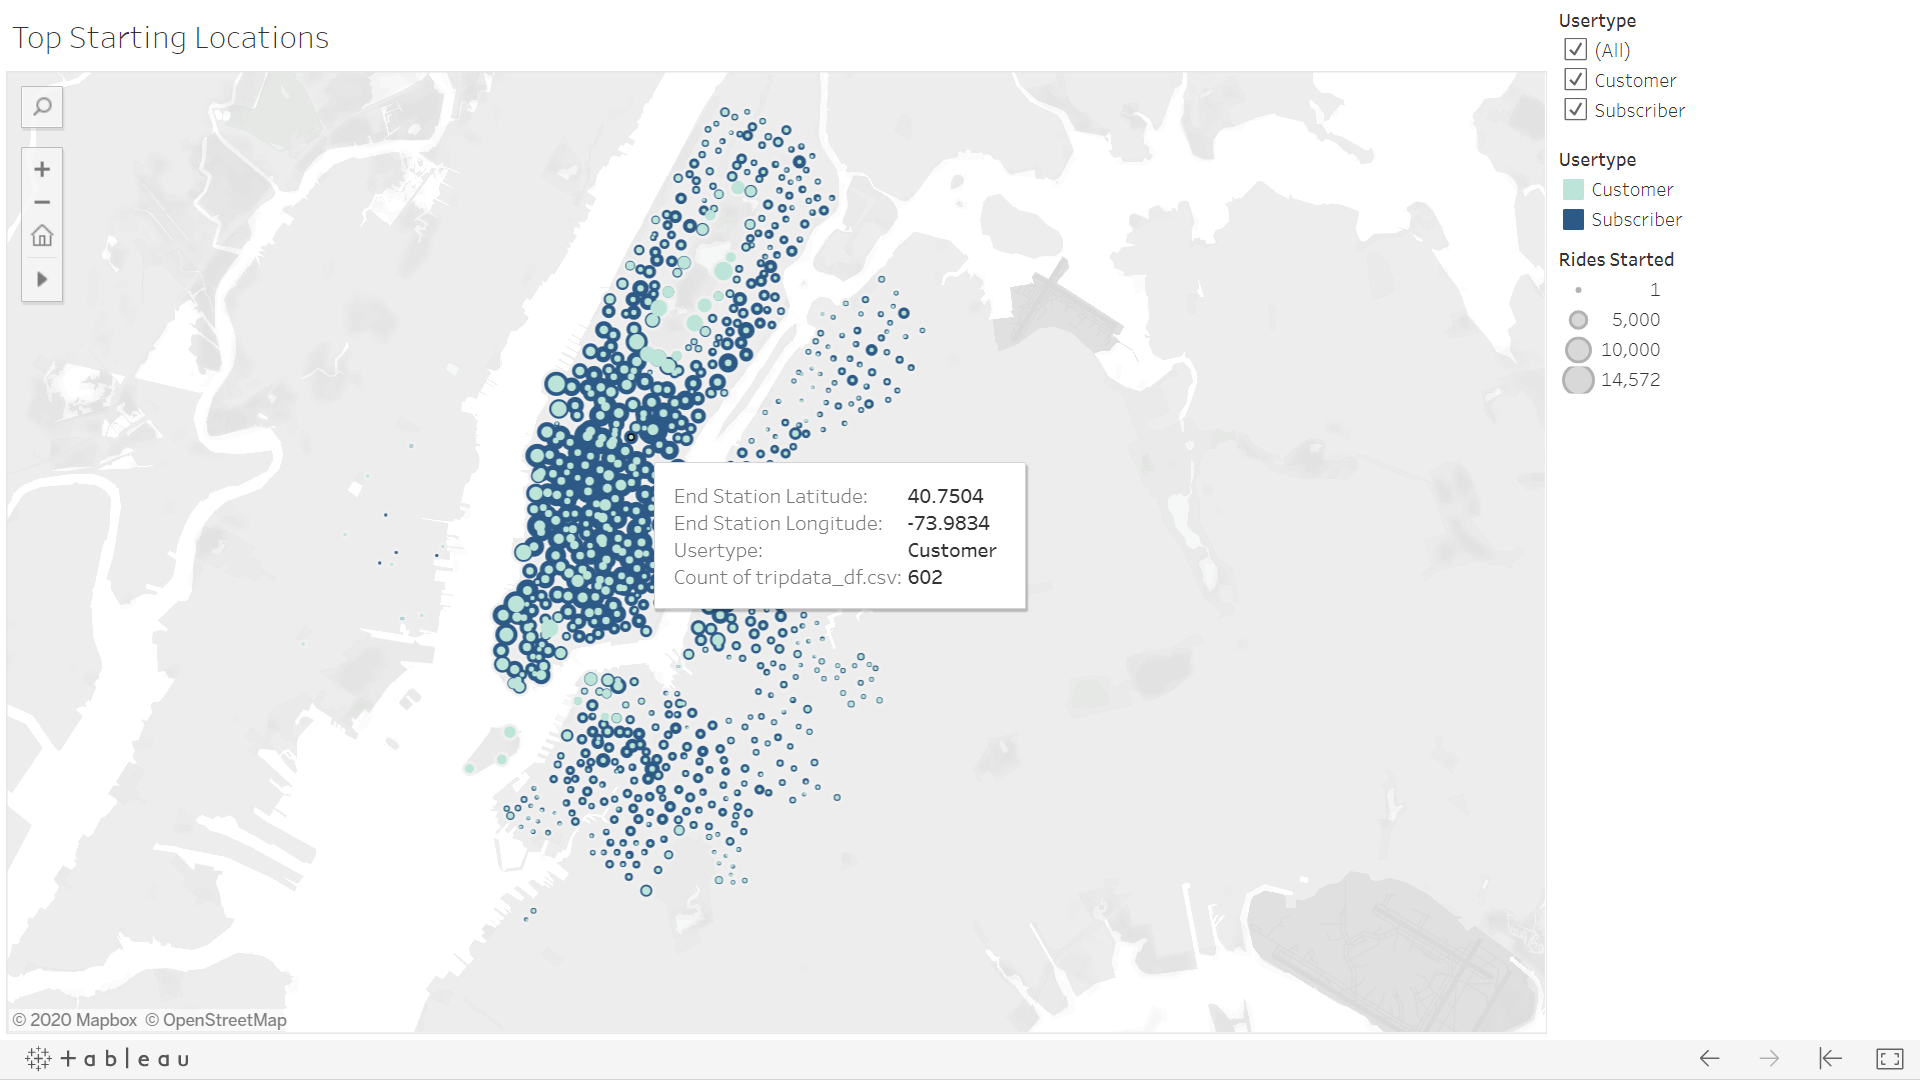
Here we can see that most trips begin in the downtown area. This begs the question, “Are the majority of riders tourists or commuters?” The filter on this map will help us compare, but we can also look at a little more information about the trips people are taking.
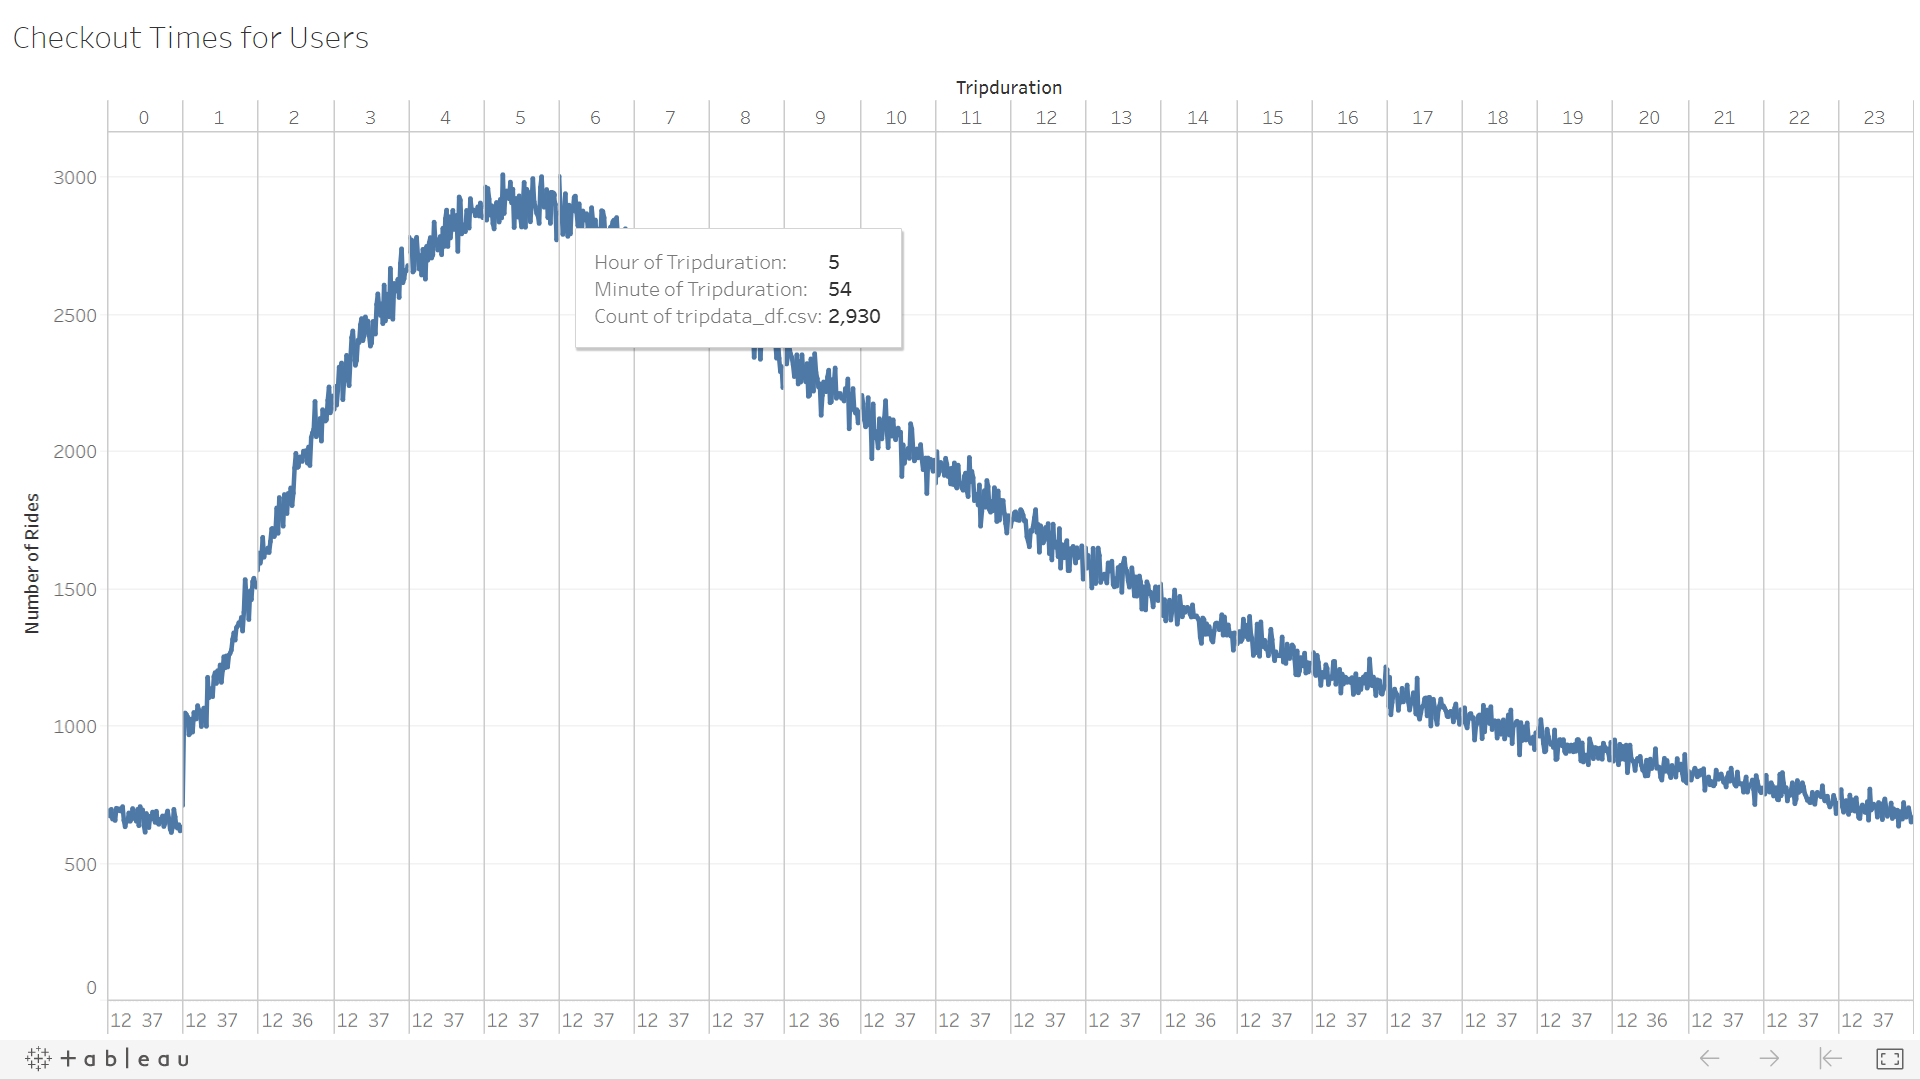
We can see on this line chart that most rides last between three and six hours. I wonder if these users are taking a long, scenic ride like my partner and I did. Maybe they are riders who commuted to work, but reserved the bike for the ride home. Let’s see what else we can learn.
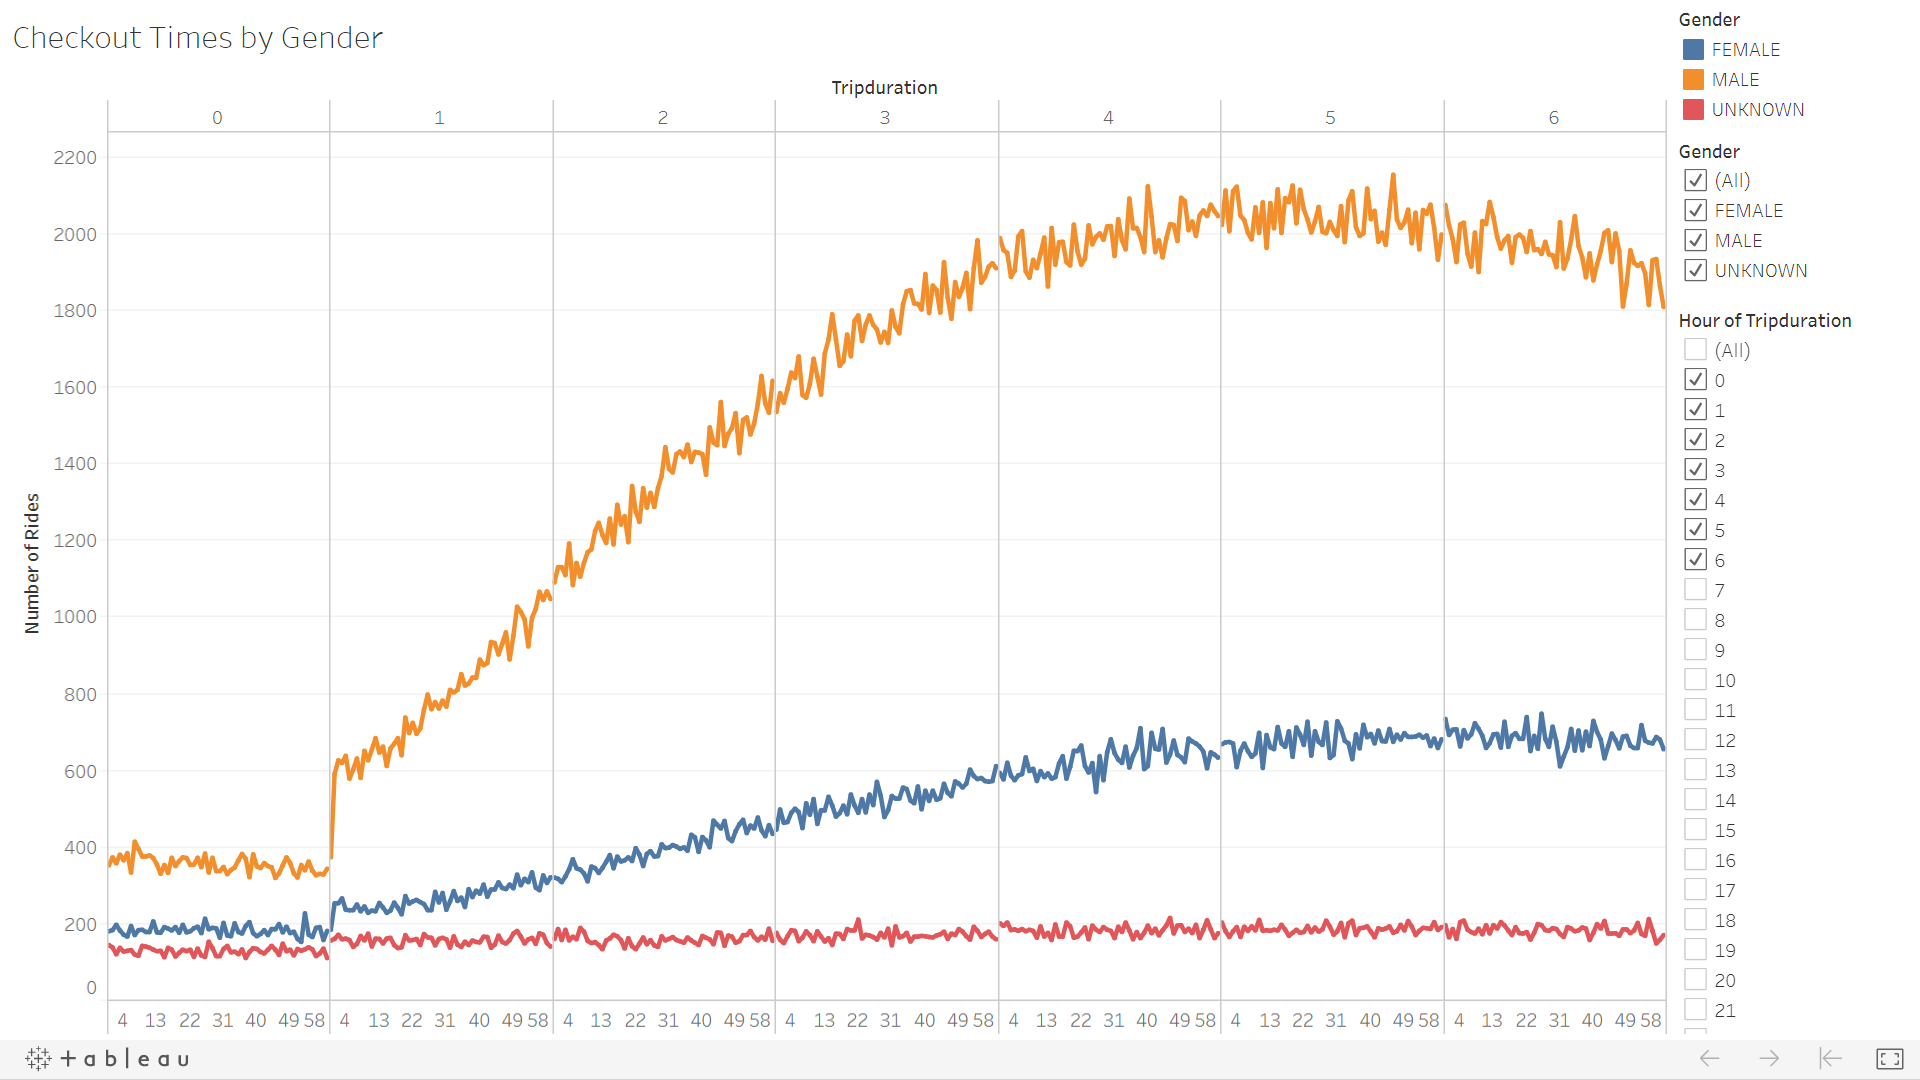
Wow! When we breakdown those trips by the gender of the rider, we can see that most customers are males. We still aren’t sure if these guys are saving the environment on their way to work, or cruising around the city taking in the sights.
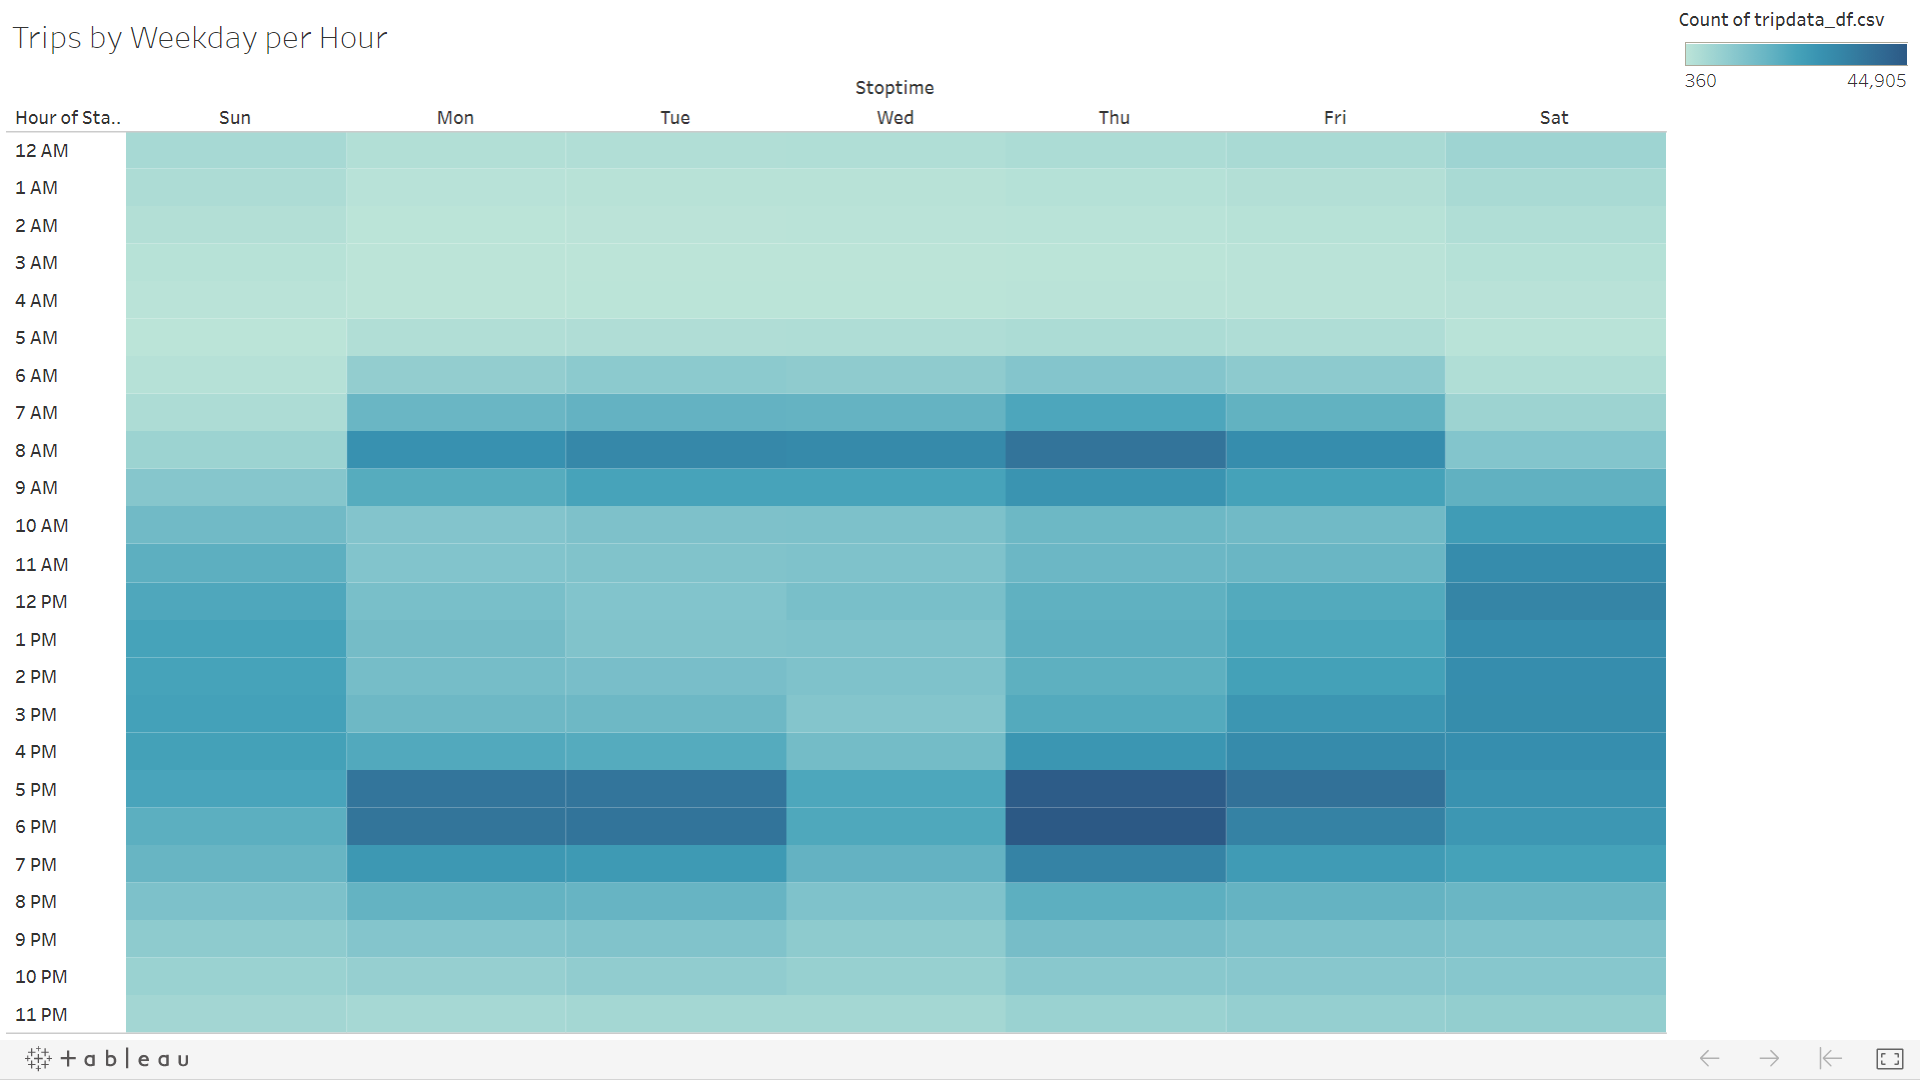
This heat map shows that most trips begin 8AM-9AM and 5PM-7PM on weekdays. There is some moderate afternoon acitivity on the weekends.
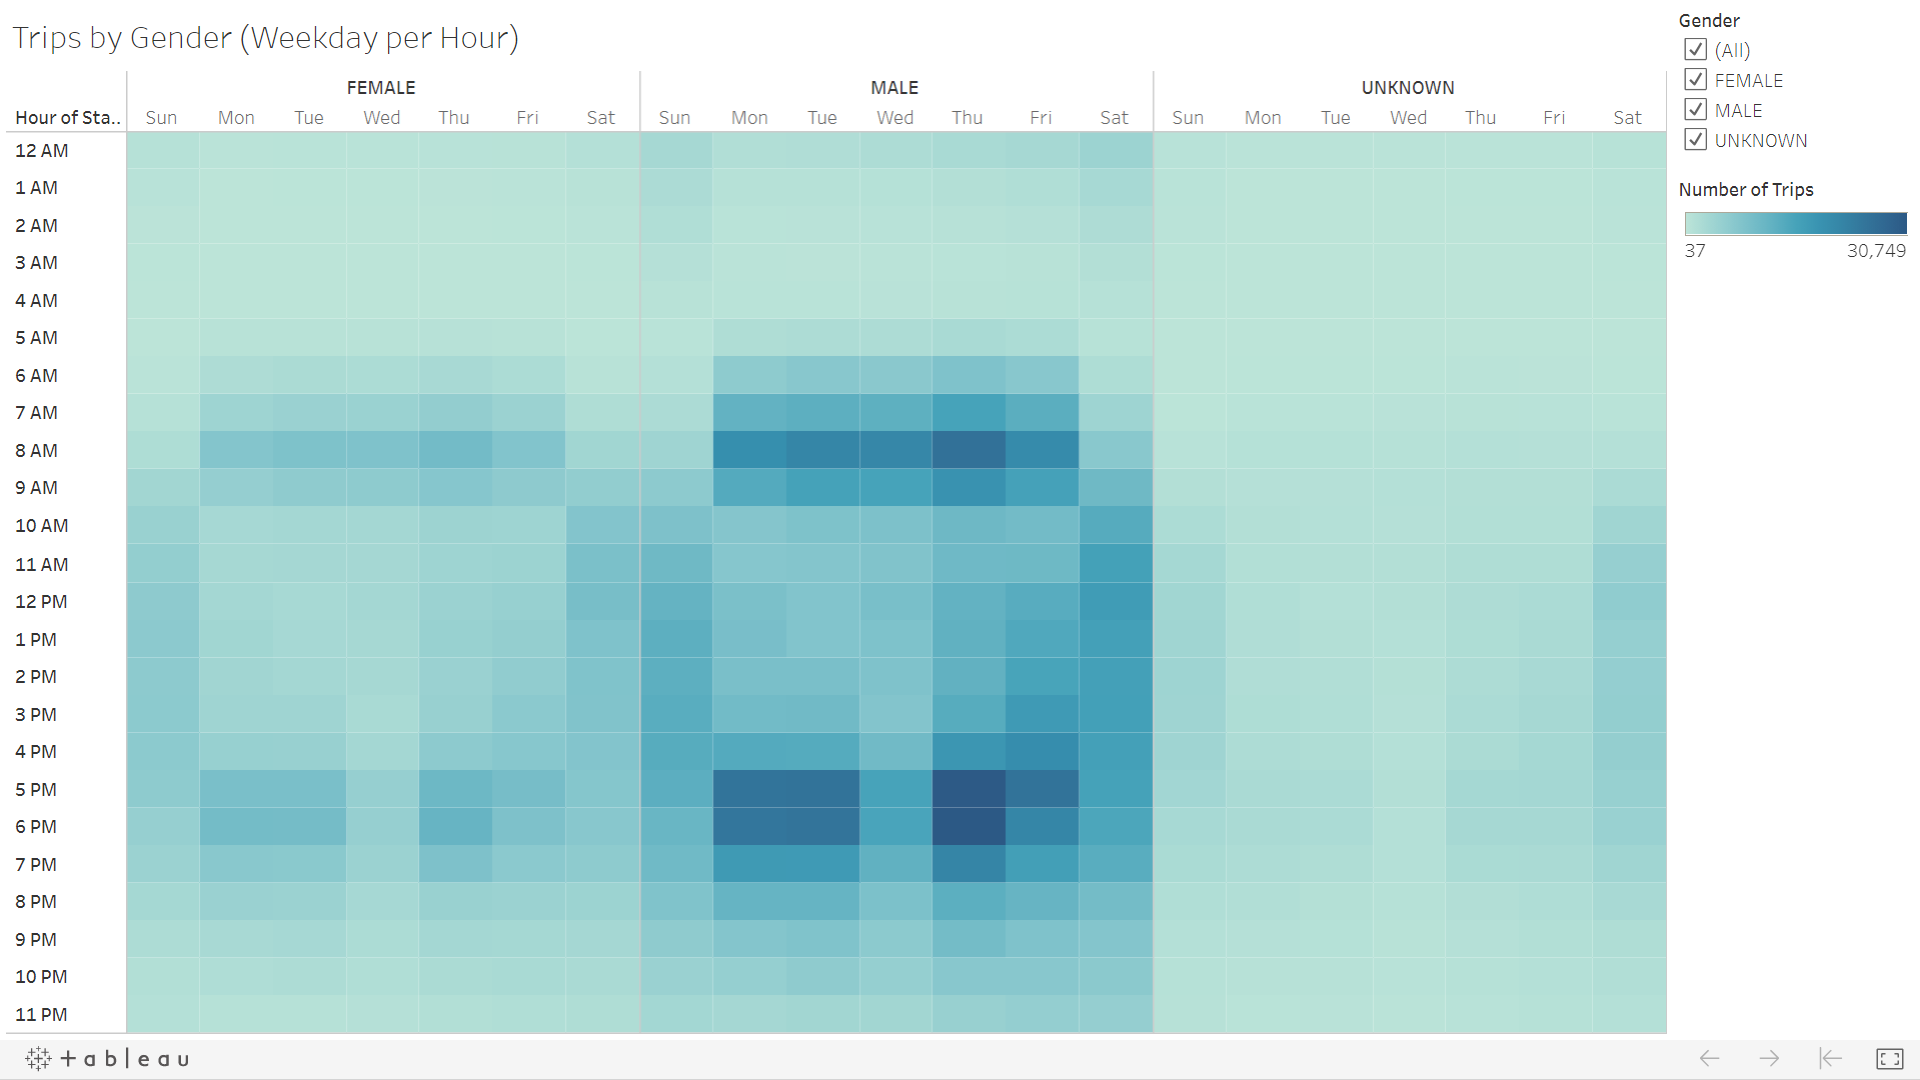
Drilling down to look at when each gender begins their trip, it appears Rush Hours are still the busiest regardelss of gender. It also confirms that males are the majority of riders.
When we split the heat map between Short Term Customers and Subscribers, we can see that the majority of rides are taken by male subscribers on any day of the week.
This pie chart shows the proportion of Subscribers to Short Term Customers. Overwhelmingly, the CitiBike customer is a subscriber.
Analysis
The above visualizations and the Tableau Story I’ve created tell us a lot about what kind of person uses CitiBikes. Based on the data we have, male subscribers (most likely on their work commute) are the heaviest users of CitiBike. This could work to keep Des Moines clean, green, and healthy. More information would be helpful to determine the cost of maintaining the bikes. It would be helpful to compare starting and ending locations of each individual bike trip. It would help us know if most trips are short, one-way rides or if the user is riding round-trip and possibly not putting as many miles on the bike. Number of rides by age would be helpful to know as well. Perhaps the bikes are being used by college students and future executives alike!
This is a list of 2 lists of the languages currently used for this project:
Human spoken languages
Currently, this project is written in only 1 human spoken language, with no translations. This includes:
English (US)
No other human spoken languages are in use for this project.
Computer languages
This project is written in 4 different computer languages, that include:
HTML5
CSS3
Markdown
Plain Text
No other languages
That is the list of languages used on this project
Editions
This is a list of 2 lists of the editions of this website:
Google sites edition
The Google sites edition is the current live edition of the site, but it is incomplete. I am still trying to figure out how to get a digital copy of it.
The HTML5 edition is the version I created from scratch, so that I could have more functional, and control… and a digital copy.
Both versions have been developed near the same amount, this version isn’t complete as well.
Pet streaming
Pet streaming is a feature I am trying to figure out how to add, it is an extra option where pets kept in the stall can be live streamed to the website, so that you can check on them while you are away, and after your visit ends, you can choose to download the videos of the stream.
This feature is not very developed at the moment, and does not work.
GitHub issues
This is a list of the current GitHub issues for this project:
It shows a chat application in which socket.io is used to connect server and client.
Also, It supports 1-to-1 and groupchat using channel based communication.
In this project, PUBSUB structure was deployed to support Say, Join and Leave.
The server has a strangth to support massive traffics where the number of members is huge in a chatroom.
It is different with mobile text application since delivery and display notifications are not required since all members basically show a chatroom together as well as Slack.